Ribbon Customization Part 11:Enable,Disable Ribbon button based on Security Role

After  a small gap I am blogging again, as I have there  there is a requirement for the ribbon controls to he shown depending on the security role.

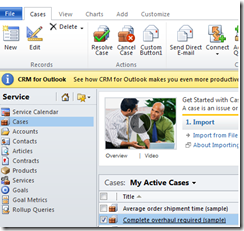
So in this post I am  going to show a  custom button, in the Case homepage grid  under the Actions group. and I will make this button to be enabled only when the user with the “System Admin”role has logged in and I don’t enable this button for the rest of the users. << and also this button has the functionality for the Resolve Case>>

Steps to follow

  1. Create a solution
  2. Add  the entity ‘case’
  3. Add a Javascript webresource with the following code and named as ‘CommonLibrabry’
  4. function UserHasRole(roleName) {


        var serverUrl = Xrm.Page.context.getServerUrl();

        var oDataEndpointUrl = serverUrl + "/XRMServices/2011/OrganizationData.svc/";

        oDataEndpointUrl += "RoleSet?$top=1&$filter=Name eq '" + roleName + "'";

        var service = GetRequestObject();

        if (service != null) {

            service.open("GET", oDataEndpointUrl, false);

            service.setRequestHeader("X-Requested-Width", "XMLHttpRequest");

            service.setRequestHeader("Accept", "application/json, text/javascript, */*");

            service.send(null);

            var requestResults = eval('(' + service.responseText + ')').d;

            if (requestResults != null && requestResults.results.length == 1) {

                var role = requestResults.results[0]; 

                var id = role.RoleId;

                var currentUserRoles = Xrm.Page.context.getUserRoles();

                for (var i = 0; i < currentUserRoles.length; i++) {

                    var userRole = currentUserRoles[i];

                    if (GuidsAreEqual(userRole, id)) {

                        return true;

                    }

                }

            }

        }


        return false;

    }


    function GetRequestObject() {

        if (window.XMLHttpRequest) {

            return new window.XMLHttpRequest;

        }

        else {

            try {

                return new ActiveXObject("MSXML2.XMLHTTP.3.0");

            }

            catch (ex) {

                return null;

            }

        }

    }

    function GuidsAreEqual(guid1, guid2) {

        var isEqual = false;

        if (guid1 == null || guid2 == null) {

            isEqual = false;

        }

        else {

            isEqual = guid1.replace(/[{}]/g, "").toLowerCase() == guid2.replace(/[{}]/g, "").toLowerCase();

        }


        return isEqual;

    }


    function callMain() {


    if(UserHasRole("System Administrator"))

    {

    return true;

    }

    else 

    {

    return false;

    }


    }

  5. Export the solution
  6. Unzip the solution
  7. Edit the customization
  8. Add the below custom action to display the button under the –Actions Group in the HomepageGrid
  9. <CustomAction Id ="sample.HomepageGrid.incident.MainTab.Actions.CustomAction" 

    Location ="Mscrm.HomepageGrid.incident.MainTab.Actions.Controls._children" 

                           Sequence ="10">

              <CommandUIDefinition>           

                  <Button Id="sample.HomepageGrid.incident.MainTab.Actions.Button"

                          Command="sample.HomepageGrid.incident.MainTab.Actions.Command"

                          LabelText="$LocLabels:sample.HomepageGrid.incident.MainTab.Actions.LabelText"

                          ToolTipTitle="$LocLabels:sample.HomepageGrid.incident.MainTab.Actions.LabelText"

                          ToolTipDescription="$LocLabels:sample.HomepageGrid.incident.MainTab.Actions.ToolTip"

                          TemplateAlias="o1"

                          Image16by16="/_imgs/ribbon/AddEmail_16.png"

                          Image32by32="/_imgs/ribbon/Email_32.png" />             

              </CommandUIDefinition>         

            </CustomAction>

  10. Define the command definition., basically this button has the functionality of << Resolving a case>>
    1. this will enable when only one record is selected in the Grid and also if the user has the ‘System Administrator” Role
    2. <CommandDefinition Id="sample.HomepageGrid.incident.MainTab.Actions.Command">

                 <EnableRules>

                   <EnableRule Id="Mscrm.CustomcheckRole" />

                   <EnableRule Id="Mscrm.SelectionCountExactlyOne" />             

                   <EnableRule Id="Mscrm.VisualizationPaneNotMaximized" />

                 </EnableRules>

                 <DisplayRules>

                   <DisplayRule Id="Mscrm.CanChangeIncidentForm" />

                 </DisplayRules>

                 <Actions>

                   <JavaScriptFunction FunctionName="Mscrm.IncidentActions.resolveCase" Library="/_static/_common/scripts/ribbonactions.js">

                     <CrmParameter Value="FirstSelectedItemId" />

                     <CrmParameter Value="SelectedControl" />

                   </JavaScriptFunction>

                 </Actions>

               </CommandDefinition>

  11. Provide the appropriate Display rule as well as the Enable rules as shown below
  12. <DisplayRules>

               <DisplayRule Id="Mscrm.CanChangeIncidentForm">

                 <EntityPrivilegeRule EntityName="incident" PrivilegeType="Write" PrivilegeDepth="Basic" />

                 <EntityPrivilegeRule EntityName="incident" PrivilegeType="AppendTo" PrivilegeDepth="Basic" />

                 <EntityPrivilegeRule EntityName="activitypointer" PrivilegeType="Create" PrivilegeDepth="Basic" />

                 <EntityPrivilegeRule EntityName="activitypointer" PrivilegeType="Append" PrivilegeDepth="Basic" />

               </DisplayRule>            

             </DisplayRules>

             <EnableRules>

               <EnableRule Id="Mscrm.SelectionCountExactlyOne">

                 <SelectionCountRule Minimum="1" Maximum="1" AppliesTo="SelectedEntity" />

               </EnableRule>

               <EnableRule Id="Mscrm.VisualizationPaneNotMaximized">

                 <CustomRule FunctionName="Mscrm.RibbonActions.disableButtonsWhenChartMaximized"

             Library="/_static/_common/scripts/RibbonActions.js">

                   <CrmParameter Value="SelectedControl" />

                 </CustomRule>

               </EnableRule>

               <EnableRule Id="Mscrm.CustomcheckRole">

                 <CustomRule FunctionName="callMain"

     Library="$webresource:new_CommonLibrary">

                 </CustomRule>

               </EnableRule>

             </EnableRules>

  13. Provide the locales as shown below
  14. <LocLabels>

             <LocLabel Id="sample.HomepageGrid.incident.MainTab.Actions.LabelText">

               <Titles>

                 <Title languagecode="1033"

                         description="Custom Button1" />

               </Titles>

             </LocLabel>

             <LocLabel Id="sample.HomepageGrid.incident.MainTab.Actions.ToolTip">

               <Titles>

                 <Title languagecode="1033"

                         description="Custom Button1" />

               </Titles>

             </LocLabel>

           </LocLabels>

  15. The screenshot appears as  shown below. when I logged with a user having system Admin role
  16. EnableRibbon button based on securityrole_CRM2011
  17. The screenshot appears as  shown below. when I logged with a user who doesn’t have system Admin role
  18. disable ribbon button based on security Role_CRM 2011
  19. The entire source code can be downloaded from here
  20. Happy learning Smile

Dynamics CRM 2011 Ribbon Customization Index

Here I am listing the index for my posts For Ribbon Customization

Topic Link
Understanding the CRM 2011 Ribbon
https://dynamicscrm2011.wordpress.com/2011/04/05/ribbon-customization/
Adding a Custom Tab to the CRM 2011 ribbon ( for HomePageGrid., and this will display for all the entities—like a Custom ISV Tab)

https://dynamicscrm2011.wordpress.com/2011/04/12/ms-dynamics-crm-2011-ribbon-customization-part-i-add-a-custom-tab-to-microsoft-dynamics-crm-2011-ribbon/

Understanding the Ribbon Customization-Schemas of the Ribbon https://dynamicscrm2011.wordpress.com/2011/04/12/ms-dynamics-crm-2011-ribbon-customization-part-2-understanding-the-ribbon-customization/
Adding a Custom Tab to the Specific Entity ( i.e for opportunity entity) https://dynamicscrm2011.wordpress.com/2011/04/13/ribbon-customization-part-3-add-a-custom-tab-to-a-specific-entityopportunity-entity/
Adding a Custom Tab, Custom Group,Button to the Grid Ribbon of a specific entity (i.e for Opportunity Entity) https://dynamicscrm2011.wordpress.com/2011/04/27/ribbon-customization-part-4-add-a-custom-tab-custom-group-and-custom-buttons-to-a-specific-entityopportunity-entity/
Adding a Custom Tab, Custom Group,Button to the Form Ribbon and SubGrid Ribbon of a specific entity (i.e for Opportunity Entity) https://dynamicscrm2011.wordpress.com/2011/04/27/ribbon-customization-part-5-add-a-custom-tab-custom-group-and-custom-buttons-to-a-form-ribbon-for-a-specific-entityopportunity-entity/
Adding a  Custom Group,Button to the existing tab of a specific entity (i.e for Opportunity Entity) https://dynamicscrm2011.wordpress.com/2011/04/28/ribbon-customization-part-6-add-a-custom-group-and-custom-buttons-to-existing-tab-for-a-specific-entityopportunity-entity/
Hiding a Ribbon Button in CRM 2011 https://dynamicscrm2011.wordpress.com/2011/04/28/ribbon-customization-part-7-hiding-a-ribbon-button-in-dynamics-crm-2011/
Hiding a Group of Ribbon Buttons in CRM 2011 https://dynamicscrm2011.wordpress.com/2011/04/29/ribbon-customization-part-8-hiding-a-group-of-ribbon-buttons-in-dynamics-crm-2011/
Adding a Button to Existing Group for custom entity’s Ribbon in Dynamics CRM 2011 https://dynamicscrm2011.wordpress.com/2011/05/02/ribbon-customization-part-9-adding-a-button-to-existing-group-for-custom-entitys-ribbon-in-dynamics-crm-2011/


Ribbon Customization-Part 6-Add a Custom Group and Custom Buttons to Existing Tab for a Specific Entity(Opportunity Entity)

As we have seen how to add Custom Tab,Custom Group, Custom Buttons to Display on Entity Form, Sub Grids, in my earlier post, Today we will see how to add Custom Group and Custom Buttons to an existing tab for Opportunity Entity.

To day we will perform the following tasks

  1. We will add a Custom group with the Buttons in the Opportunities Tab(i.e Homepage Grid) for Opportunity  entity as shown in the below screenshot
  2. Adding Custom Buttons to Exsiting Tab in MSCRM 2011 ribbon Customization
  3. As usual create a new solution with the Opportunity entity, save and export it
  4. unzip the solution and Edit the “customizations.xml”
  5. As we need to add  a custom group to the existing tab we need to get the Id of the Tab and also the Group id where we want to place the new group. So for this we need to check the Opportunityribbon.xml which will be available under the folder \\ sdk\samplecode\cs\client\ribbon\exportribbonxml\exportedribbonxml\
  6. Opportunityribbon.xml will appear as shown in the below screenshot and we will add the custom group with buttons to the Home Page Grid main tab and the tab in which we are going to create a new group is  highlighted and also the group where we are creating a new group next to the group is also shown in the below screenshot
  7. OpportunityRibbonxml with groups
  8. I defined the customActions as shown in the below  code snippet
       1: <CustomAction Id="Sample.Grid.opportunity.CustomGroup.MaxSize.CustomAction" Location="Mscrm.HomepageGrid.opportunity.MainTab.Scaling._children" Sequence="150">

       2:             <CommandUIDefinition>

       3:               <MaxSize Id="Sample.Grid.opportunity.CustomGroup.MaxSize" GroupId="Sample.Grid.opportunity.CustomGroup.Group" Sequence="21" Size="LargeLarge" />

       4:             </CommandUIDefinition>

       5:           </CustomAction>

       6:           

       7:           <CustomAction Id="Sample.Grid.opportunity.CustomGroup.CustomAction" Location="Mscrm.HomepageGrid.opportunity.MainTab.Groups._children" Sequence="115">

       8:             <CommandUIDefinition>

       9:               <Group Id="Sample.Grid.opportunity.CustomGroup.Group" Command="Sample.Grid.opportunity.CustomGroup.Command" Title="$LocLabels:Sample.Grid.opportunity.CustomGroup.Title" Sequence="85" Template="Mscrm.Templates.3.3" >

      10:                 <Controls Id="Sample.Grid.opportunity.CustomGroup.Controls">

      11:                   <Button Id="Sample.Grid.opportunity.CustomGroup.Button.A" Command="Sample.Grid.opportunity.CustomGroup.Button.A.Command" Sequence="10" LabelText="$LocLabels:Sample.Grid.opportunity.CustomGroup.Button.A.LabelText" ToolTipTitle="$LocLabels:Sample.Grid.opportunity.CustomGroup.Button.A.LabelText" ToolTipDescription="$LocLabels:Sample.Grid.opportunity.CustomGroup.Button.A.Description" TemplateAlias="o1" Image16by16="/_imgs/ribbon/AddEmail_16.png" Image32by32="/_imgs/ribbon/Email_32.png" />

      12:                   <Button Id="Sample.Grid.opportunity.CustomGroup.Button.B" Command="Sample.Grid.opportunity.CustomGroup.Button.B.Command" Sequence="20" LabelText="$LocLabels:Sample.Grid.opportunity.CustomGroup.Button.B.LabelText" ToolTipTitle="$LocLabels:Sample.Grid.opportunity.CustomGroup.Button.B.LabelText" ToolTipDescription="$LocLabels:Sample.Grid.opportunity.CustomGroup.Button.B.Description" TemplateAlias="o1" Image16by16="/_imgs/ribbon/AddEmail_16.png" Image32by32="/_imgs/ribbon/Email_32.png" />

      13:                 </Controls>

      14:               </Group>

      15:             </CommandUIDefinition>

      16:           </CustomAction> 

      17:         </CustomActions>

  9. Added the corresponding CommandDefinition as shown in the below code snippet
  10.    1: <LocLabel Id="Sample.Grid.opportunity.CustomGroup.Button.A.Description">

       2:         <Titles>

       3:           <Title languagecode="1033" description="First Button Description" />

       4:         </Titles>

       5:       </LocLabel>

       6:       <LocLabel Id="Sample.Grid.opportunity.CustomGroup.Button.B.Description">

       7:         <Titles>

       8:           <Title languagecode="1033" description="Second Button Description" />

       9:         </Titles>

      10:       </LocLabel>

      11:       

      12:       <LocLabel Id="Sample.Grid.opportunity.CustomGroup.Title">

      13:         <Titles>

      14:           <Title languagecode="1033" description="First Group" />

      15:         </Titles>

      16:       </LocLabel>

      17:       <LocLabel Id="Sample.Grid.opportunity.CustomGroup.Button.A.LabelText">

      18:         <Titles>

      19:           <Title languagecode="1033" description="First Button" />

      20:         </Titles>

      21:       </LocLabel>

      22:       <LocLabel Id="Sample.Grid.opportunity.CustomGroup.Button.A.ToolTipDescription">

      23:         <Titles>

      24:           <Title languagecode="1033" description="First Button" />

      25:         </Titles>

      26:       </LocLabel>

      27:       <LocLabel Id="Sample.Grid.opportunity.CustomGroup.Button.B.LabelText">

      28:         <Titles>

      29:           <Title languagecode="1033" description="Second Button" />

      30:         </Titles>

      31:       </LocLabel>

      32:       <LocLabel Id="Sample.Grid.opportunity.CustomGroup.Button.B.ToolTipDescription">

      33:         <Titles>

      34:           <Title languagecode="1033" description="Second Button" />

      35:         </Titles>

      36:       </LocLabel>

  11. In total We have added the CustomActions   for Group and the Scaling for the group
  12. In the Group we created the buttons
  13. For buttons we have added the Command Definitions and Corresponding the Labels
  14. Zip the Solution and import it to CRM and navigate to opportunities  you can see the desired result
  15. Download the  Complete solution from here

Note:This post solution contains the customizations of the earlier post as well

Ribbon Customization-Part 5-Add a Custom Tab, Custom Group and Custom Buttons to a Form Ribbon, Grid Ribbon for a Specific Entity(Opportunity Entity)

In my earlier post we have seen how to add custom buttons to the Entity Gird Ribbon for opportunity entity in CRM 2011

Now we will see how to add the same buttons to Entity Form level ribbon  and Sub Grid Ribbon ( The Ribbon that will show when the Control is in the Sub grid with in the Opportunity Entity Form and also  Sub grids showing the Opportunity Associated view)

  1. Create a new Solution called ”OpportunityFormlevelRibbon”  then Add Opportunity entity, and any dependency objects  and also the web resource”ShowMessage.js” which we created in the earlier post and export it and save it in  the disk
  2. unzip the solutions and Edit the customizations.xml
  3. Add the below <<CustomActions>> in addition to the existing custom action
  4.    1: <!--CustomAction  for  Tab, group, buttons to display in Form-->

       2:          <CustomAction Id="Sample.Form.opportunity.CustomTab.CustomAction" Location="Mscrm.Tabs._children" Sequence="40">

       3:            <CommandUIDefinition>

       4:              <Tab Id="Sample.Form.opportunity.CustomTab" Command="Sample.Form.opportunity.CustomTab" Title="$LocLabels:Sample.opportunity.CustomTab.Title" Description="$LocLabels:Sample.opportunity.CustomTab.Description" Sequence="40">

       5:                <Scaling Id="Sample.Form.opportunity.CustomTab.Scaling">

       6:                  <MaxSize Id="Sample.Form.opportunity.CustomTab.FirstGroup.MaxSize" GroupId="Sample.Form.opportunity.CustomTab.FirstGroup" Sequence="10" Size="LargeMedium" />

       7:                </Scaling>

       8:                <Groups Id="Sample.Form.opportunity.CustomTab.Groups">

       9:                  <Group Id="Sample.Form.opportunity.CustomTab.FirstGroup" Command="Sample.Form.opportunity.FirstGroup" Sequence="10" Title="$LocLabels:Sample.opportunity.CustomTab.FirstGroup.Title" Template="Mscrm.Templates.3.3">

      10:                    <Controls Id="Sample.Form.opportunity.CustomTab.FirstGroup.Controls">

      11:                      <Button Id="Sample.Form.opportunity.CustomTab.FirstGroup.FirstButton" ToolTipTitle="$LocLabels:Sample.opportunity.CustomTab.FirstGroup.FirstButton.LabelText" ToolTipDescription="$LocLabels:Sample.opportunity.CustomTab.FirstGroup.FirstButton.ToolTipDescription" Command="Sample.Form.opportunity.FirstButton" Sequence="10" LabelText="$LocLabels:Sample.opportunity.CustomTab.FirstGroup.FirstButton.LabelText" Alt="$LocLabels:Sample.opportunity.CustomTab.FirstGroup.FirstButton.LabelText" Image16by16="/_imgs/ribbon/AddEmail_16.png" Image32by32="/_imgs/ribbon/Email_32.png" TemplateAlias="o1" />

      12:                      <Button Id="Sample.Form.opportunity.CustomTab.FirstGroup.SecondButton" ToolTipTitle="$LocLabels:Sample.opportunity.CustomTab.FirstGroup.SecondButton.LabelText" ToolTipDescription="$LocLabels:Sample.opportunity.CustomTab.FirstGroup.SecondButton.ToolTipDescription" Command="Sample.Form.opportunity.SecondButton" Sequence="20" LabelText="$LocLabels:Sample.opportunity.CustomTab.FirstGroup.SecondButton.LabelText" Alt="$LocLabels:Sample.opportunity.CustomTab.FirstGroup.SecondButton.LabelText" Image16by16="/_imgs/ribbon/AddEmail_16.png" Image32by32="/_imgs/ribbon/Email_32.png" TemplateAlias="o1" />

      13:                     

      14:                    </Controls>

      15:                  </Group>

      16:                </Groups>

      17:              </Tab>

      18:            </CommandUIDefinition>

      19:          </CustomAction>

      20:  

      21:          <!--CustomAction  for  Tab, group, buttons to display in  Form Subgrid-->

      22:          <CustomAction Id="Sample.SubGrid.opportunity.CustomTab.CustomAction" Location="Mscrm.SubGrid.opportunity.ContextualTabs._children" Sequence="40">

      23:            <CommandUIDefinition>

      24:              <Tab Id="Sample.SubGrid.opportunity.CustomTab" Command="Sample.SubGrid.opportunity.CustomTab" Title="$LocLabels:Sample.opportunity.CustomTab.Title" Description="$LocLabels:Sample.opportunity.CustomTab.Description" Sequence="500">

      25:                <Scaling Id="Sample.SubGrid.opportunity.CustomTab.Scaling">

      26:                  <MaxSize Id="Sample.SubGrid.opportunity.CustomTab.FirstGroup.MaxSize" GroupId="Sample.SubGrid.opportunity.CustomTab.FirstGroup" Sequence="10" Size="LargeMedium" />

      27:                </Scaling>

      28:                <Groups Id="Sample.SubGrid.opportunity.CustomTab.Groups">

      29:                  <Group Id="Sample.SubGrid.opportunity.CustomTab.FirstGroup" Command="Sample.SubGrid.opportunity.FirstGroup" Sequence="10" Title="$LocLabels:Sample.opportunity.CustomTab.FirstGroup.Title" Template="Mscrm.Templates.3.3">

      30:                    <Controls Id="Sample.SubGrid.opportunity.CustomTab.FirstGroup.Controls">

      31:                       <Button Id="Sample.SubGrid.opportunity.CustomTab.FirstGroup.FirstButton" ToolTipTitle="$LocLabels:Sample.opportunity.CustomTab.FirstGroup.FirstButton.LabelText" ToolTipDescription="$LocLabels:Sample.opportunity.CustomTab.FirstGroup.FirstButton.ToolTipDescription" Command="Sample.SubGrid.opportunity.FirstButton" Sequence="10" LabelText="$LocLabels:Sample.opportunity.CustomTab.FirstGroup.FirstButton.LabelText" Alt="$LocLabels:Sample.opportunity.CustomTab.FirstGroup.FirstButton.LabelText" Image16by16="/_imgs/ribbon/AddEmail_16.png" Image32by32="/_imgs/ribbon/Email_32.png" TemplateAlias="o1" />

      32:                      <Button Id="Sample.SubGrid.opportunity.CustomTab.FirstGroup.SecondButton" ToolTipTitle="$LocLabels:Sample.opportunity.CustomTab.FirstGroup.SecondButton.LabelText" ToolTipDescription="$LocLabels:Sample.opportunity.CustomTab.FirstGroup.SecondButton.ToolTipDescription" Command="Sample.SubGrid.opportunity.SecondButton" Sequence="20" LabelText="$LocLabels:Sample.opportunity.CustomTab.FirstGroup.SecondButton.LabelText" Alt="$LocLabels:Sample.opportunity.CustomTab.FirstGroup.SecondButton.LabelText" Image16by16="/_imgs/ribbon/AddEmail_16.png" Image32by32="/_imgs/ribbon/Email_32.png" TemplateAlias="o1" />                      

      33:                    </Controls>

      34:                  </Group>

      35:                </Groups>

      36:              </Tab>

      37:            </CommandUIDefinition>

      38:          </CustomAction>

  5. Add the below CommandDefinitions  for the above buttons, tab,group
  6.    1: <!--Command Definetions for  Tab, Group, Buttons under Form needs to be included here-->

       2:  

       3:    <CommandDefinition Id="Sample.Form.opportunity.FirstButton">

       4:      <EnableRules />

       5:      <DisplayRules />

       6:      <Actions>

       7:        <Url Address="http://www.microsoft.com"></Url>

       8:      </Actions>

       9:    </CommandDefinition>

      10:    <CommandDefinition Id="Sample.Form.opportunity.SecondButton">

      11:      <EnableRules />

      12:      <DisplayRules />

      13:      <Actions>

      14:        <JavaScriptFunction Library="$webresource:new_/ShowMessage.js" FunctionName="show">

      15:          <StringParameter Value="2" />

      16:        </JavaScriptFunction>

      17:      </Actions>

      18:    </CommandDefinition>

      19:    <CommandDefinition Id="Sample.Form.opportunity.FirstGroup">

      20:      <EnableRules>

      21:        <EnableRule Id="Mscrm.Enabled " />

      22:      </EnableRules>

      23:      <DisplayRules>

      24:        <DisplayRule Id="Mscrm.CanWriteOpportunity" />

      25:      </DisplayRules>

      26:      <Actions />

      27:    </CommandDefinition>

      28:    <CommandDefinition Id="Sample.Form.opportunity.CustomTab">

      29:      <EnableRules>

      30:        <EnableRule Id="Mscrm.Enabled " />

      31:      </EnableRules>

      32:      <DisplayRules>

      33:        <DisplayRule Id="Mscrm.CanWriteOpportunity" />

      34:      </DisplayRules>

      35:      <Actions />

      36:    </CommandDefinition>

      37:  

      38:    <!--Command Definetions for  Tab, Group, Buttons under Form's SubGrid needs to be included here-->

      39:    <CommandDefinition Id="Sample.SubGrid.opportunity.FirstButton">

      40:      <EnableRules />

      41:      <DisplayRules />

      42:      <Actions>

      43:        <Url Address="http://www.microsoft.com"></Url>

      44:      </Actions>

      45:    </CommandDefinition>

      46:    <CommandDefinition Id="Sample.SubGrid.opportunity.SecondButton">

      47:      <EnableRules />

      48:      <DisplayRules />

      49:      <Actions>

      50:        <JavaScriptFunction Library="$webresource:new_/ShowMessage.js" FunctionName="show">

      51:          <StringParameter Value="2" />

      52:        </JavaScriptFunction>

      53:      </Actions>

      54:    </CommandDefinition>

      55:    <CommandDefinition Id="Sample.SubGrid.opportunity.FirstGroup">

      56:      <EnableRules>

      57:        <EnableRule Id="Mscrm.Enabled " />

      58:      </EnableRules>

      59:      <DisplayRules>

      60:        <DisplayRule Id="Mscrm.CanWriteOpportunity" />

      61:      </DisplayRules>

      62:      <Actions />

      63:    </CommandDefinition>

      64:    <CommandDefinition Id="Sample.SubGrid.opportunity.CustomTab">

      65:      <EnableRules>

      66:        <EnableRule Id="Mscrm.Enabled " />

      67:      </EnableRules>

      68:      <DisplayRules>

      69:        <DisplayRule Id="Mscrm.CanWriteOpportunity" />

      70:      </DisplayRules>

      71:      <Actions />

      72:    </CommandDefinition>

      73:    

  7. Add the below Tabrules to display the tab in the Form context, Subgrid context, Subgrid context when showing in the associated view as well
  8.    1: <TabDisplayRule TabCommand="Sample.SubGrid.opportunity.CustomTab">

       2:             <EntityRule EntityName="opportunity" Context="SubGridStandard" />

       3:             <EntityRule EntityName="opportunity" Context="SubGridAssociated" />

       4:           </TabDisplayRule>

       5:           <TabDisplayRule TabCommand="Sample.Form.opportunity.CustomTab">

       6:             <EntityRule EntityName="opportunity" Context="Form" AppliesTo="PrimaryEntity" />

       7:           </TabDisplayRule>

  9. Now you can zip  and install the solution and you can the buttons appearing in the following places
    1. Entity Grid
    2. Entity Form
    3. Entity SubGrid
    4. on Opportunity Associated view as well
  10. You can Download the complete Solution from here.

Ribbon Customization-Part 4-Add a Custom Tab, Custom Group and Custom Buttons to a Grid Ribbon for a Specific Entity(Opportunity Entity)

In my earlier post we have seen how to add a custom tab to a specific entity

Today I am going to perform the following tasks

  1. Adding  a Custom Group to the  CRM 2011 Ribbon for a specific entity( I am taking opportunity entity for this purpose)
  2. Adding  a Custom Buttons to the Custom Group With the Specific Actions for the Buttons
    1. On Click of First Button we will open the “www.microsoft.com”
    2. On Click of the Second Button we will  call a simple Java script function Which exists in a web resource.

Coming to the Actions in sequence,

  • Create a new Solution called “OpportunitySolution” and add Opportunity entity  and a newly created web resource called ”ShowMessage.js” with the following Code
   1: function show(Val)

   2: {

   3: alert("Button "+Val+" action performed.");

   4: }

  • Publish the customizations
  • Export the Solutions and Save
  • Unzip the Solution and Edit the customizations.xml  with  any XML Editor  I prefer VS 2010.
  • search for <Entity> as shown the below screenshot Collapse the <FormXML> tag then you can see the <RibbonDiffXML> for the opportunity
  • Adding a Button to CRM 2011 Grid ribbon with specific actions to Opportunity Entity
  • Add the CustomActions to the RibbonDiffXMLwith the below code
  •    1: <CustomActions>

       2:        <CustomAction Id="Sample.Grid.opportunity.CustomTab.CustomAction" Location="Mscrm.Tabs._children" Sequence="40">

       3:          <CommandUIDefinition>

       4:            <Tab Id="Sample.Grid.opportunity.CustomTab" Command="Sample.Grid.opportunity.CustomTab" Title="$LocLabels:Sample.opportunity.CustomTab.Title" Description="$LocLabels:Sample.opportunity.CustomTab.Description" Sequence="500">

       5:              <Scaling Id="Sample.Grid.opportunity.CustomTab.Scaling">

       6:                <MaxSize Id="Sample.Grid.opportunity.CustomTab.FirstGroup.MaxSize" GroupId="Sample.Grid.opportunity.CustomTab.FirstGroup" Sequence="10" Size="LargeMedium" />

       7:              </Scaling>

       8:              <Groups Id="Sample.Grid.opportunity.CustomTab.Groups">

       9:                <Group Id="Sample.Grid.opportunity.CustomTab.FirstGroup" Command="Sample.Grid.opportunity.FirstGroup" Sequence="10" Title="$LocLabels:Sample.opportunity.CustomTab.FirstGroup.Title" Template="Mscrm.Templates.3.3">

      10:                  <Controls Id="Sample.Grid.opportunity.CustomTab.FirstGroup.Controls">

      11:                    <Button Id="Sample.Grid.opportunity.CustomTab.FirstGroup.FirstButton" ToolTipTitle="$LocLabels:Sample.opportunity.CustomTab.FirstGroup.FirstButton.LabelText"

      12:                            ToolTipDescription="$LocLabels:Sample.opportunity.CustomTab.FirstGroup.FirstButton.ToolTipDescription"

      13:                            Command="Sample.Grid.opportunity.FirstButton"

      14:                            Sequence="10"

      15:                            LabelText="$LocLabels:Sample.opportunity.CustomTab.FirstGroup.FirstButton.LabelText"

      16:                            Alt="$LocLabels:Sample.opportunity.CustomTab.FirstGroup.FirstButton.LabelText"

      17:                            Image16by16="/_imgs/ribbon/AddEmail_16.png"

      18:                            Image32by32="/_imgs/ribbon/Email_32.png" TemplateAlias="o1" />

      19:                    <Button Id="Sample.Grid.opportunity.CustomTab.FirstGroup.SecondButton"

      20:                            ToolTipTitle="$LocLabels:Sample.opportunity.CustomTab.FirstGroup.SecondButton.LabelText"

      21:                            ToolTipDescription="$LocLabels:Sample.opportunity.CustomTab.FirstGroup.SecondButton.ToolTipDescription"

      22:                            Command="Sample.Grid.opportunity.SecondButton"

      23:                            Sequence="20"

      24:                            LabelText="$LocLabels:Sample.opportunity.CustomTab.FirstGroup.SecondButton.LabelText"

      25:                            Alt="$LocLabels:Sample.opportunity.CustomTab.FirstGroup.SecondButton.LabelText"

      26:                            Image16by16="/_imgs/ribbon/AddEmail_16.png"

      27:                            Image32by32="/_imgs/ribbon/Email_32.png" TemplateAlias="o1" />

      28:  

      29:                  </Controls>

      30:                </Group>

      31:              </Groups>

      32:            </Tab>

      33:          </CommandUIDefinition>

      34:        </CustomAction>

      35:      </CustomActions>

  • Add the Templates with the following code
  •    1: <Templates>

       2:          <RibbonTemplates Id="Mscrm.Templates"></RibbonTemplates>

       3:        </Templates>

  • Add the <<CommandDefinitions>> with the below code
  •    1: <CommandDefinitions>

       2:          <CommandDefinition Id="Sample.Grid.opportunity.CustomTab">

       3:            <EnableRules>

       4:              <EnableRule Id="Mscrm.Enabled " />

       5:            </EnableRules>

       6:            <DisplayRules>

       7:              <DisplayRule Id="Mscrm.CanWriteOpportunity" />

       8:            </DisplayRules>

       9:            <Actions />

      10:          </CommandDefinition>

      11:          <CommandDefinition Id="Sample.Grid.opportunity.FirstGroup">

      12:            <EnableRules>

      13:              <EnableRule Id="Mscrm.Enabled " />

      14:            </EnableRules>

      15:            <DisplayRules>

      16:              <DisplayRule Id="Mscrm.CanWriteOpportunity" />

      17:            </DisplayRules>

      18:            <Actions />

      19:          </CommandDefinition>

      20:          <CommandDefinition Id="Sample.Grid.opportunity.FirstButton">

      21:            <EnableRules/>

      22:            <DisplayRules/>

      23:            <Actions>

      24:              <Url Address ="http://www.microsoft.com"></Url>

      25:            </Actions>

      26:          </CommandDefinition>

      27:          <CommandDefinition Id="Sample.Grid.opportunity.SecondButton">

      28:            <EnableRules/>

      29:            <DisplayRules/>

      30:            <Actions>

      31:              <JavaScriptFunction Library="$webresource:new_/ShowMessage.js" FunctionName="show">

      32:                <StringParameter Value="2" />

      33:              </JavaScriptFunction>

      34:            </Actions>

      35:          </CommandDefinition >

  • Observe how I have added the Actions for the buttons ,generally actions are performed by ribbon controls and these are of 2 types
    • Java script functions
    • Opening an UL
  • If you observe the First button action is “Opening an URL”
  • For  the Second Button action is –On click of the Button it would show the Message from the Java Script Function and also passing a string parameter from the Ribbon control to the JavaScript function
  • Add the <<RuleDefinitions>> with the Following code
  •    1: <RuleDefinitions>

       2:         <TabDisplayRules>

       3:           <TabDisplayRule TabCommand="Sample.Grid.opportunity.CustomTab">

       4:             <EntityRule EntityName="opportunity" Context="HomePageGrid" />

       5:           </TabDisplayRule>

       6:         </TabDisplayRules>

       7:         <DisplayRules/>

       8:         <EnableRules />

       9:       </RuleDefinitions>

  • In the Rule Definition I specified  exclusively that the buttons should appear on the Grid Ribbon only. Not on the Form Ribbon and Sub Grid Ribbon
  • Add the <LocLables> with the below code
  •    1: <LocLabels>

       2:        <LocLabel Id="Sample.opportunity.CustomTab.FirstGroup.FirstButton.LabelText">

       3:          <Titles>

       4:            <Title languagecode="1033" description="First Button" />

       5:          </Titles>

       6:        </LocLabel>

       7:        <LocLabel Id="Sample.opportunity.CustomTab.Description">

       8:          <Titles>

       9:            <Title languagecode="1033" description="A custom tab for the Opportunity entity." />

      10:          </Titles>

      11:        </LocLabel>

      12:        <LocLabel Id="Sample.opportunity.CustomTab.FirstGroup.Title">

      13:          <Titles>

      14:            <Title languagecode="1033" description="First Group" />

      15:          </Titles>

      16:        </LocLabel>

      17:        <LocLabel Id="Sample.opportunity.CustomTab.FirstGroup.FirstButton.ToolTipDescription">

      18:          <Titles>

      19:            <Title languagecode="1033" description="The first button in the first group." />

      20:          </Titles>

      21:        </LocLabel>

      22:        <LocLabel Id="Sample.opportunity.CustomTab.Title">

      23:          <Titles>

      24:            <Title languagecode="1033" description="Custom Tab" />

      25:          </Titles>

      26:        </LocLabel>

      27:        <LocLabel Id="Sample.opportunity.CustomTab.FirstGroup.SecondButton.LabelText">

      28:          <Titles>

      29:            <Title languagecode="1033" description="Second Button" />

      30:          </Titles>

      31:        </LocLabel>

      32:        <LocLabel Id="Sample.opportunity.CustomTab.FirstGroup.SecondButton.ToolTipDescription">

      33:          <Titles>

      34:            <Title languagecode="1033" description="The second button in the first group." />

      35:          </Titles>

      36:        </LocLabel>

      37:      </LocLabels>

  • Check the below screenshots  for the functionality
  • Initial display of the buttons on the Opportunity Entity Grid ribbon
  • Adding Buttons on the Grid Ribbon
  • On Click of the  first button an window will open with the URL www.microsoft.com as shown the below screenshot
  • Opening a URL from the CRM2011 Ribbon Button
  • On Click of the second Button  the result look like below screenshot and the “2” is the string parameter we passed to the JavaScript function
  • CRM2011 Ribbon Button Action
  • You can download the Complete Solution from here

Happy Learning Smile