Unable to load plugin- assembly

Usually we get this error in  different situations,

Unable to Load Plugin Assembly

one can resolve this issue by performing any of the below listed solutions,

  1. Register the Plugin  Assembly to Database
  2. Add the referenced Dlls to GAC
  3. unregister the plugin and re register again
  4. User who is running the application pool on which CRM web is running should have the read and execute permissions

CRM 2011 Web Resource Part 2: How to use “ClientGlobalContext.js.aspx”

When you work with HTML web resources, There might be situations where you need data about the CRM.

“ClientGlobalContext.js.aspx”  gives  the  Context information out side of the CRM FORM.

when we do reference to the above file, what comes next is How to refer the above file., it takes some time to figure out.,

Way1: <script src="ClientGlobalContext.js.aspx"></script>  << refer like this when you use a web resource with out having folder conventions>>

Way2: <script src="../ClientGlobalContext.js.aspx"></script>   << refer like this when you use web resource with a folder like structure

For example:Web resource name  is referred as “test_/new_HTMLResource.htm”>>

Way 3: <script src="../../ClientGlobalContext.js.aspx"></script>   << refer like this if the web resource looks like this “ test_/testing1/new_HTMLResource.htm”

I hope this would help and save lot of time of yours when you start working with Web resources

CRM 2011 Web Resource Part 1: Using HTML Web Resource

<!DOCTYPE HTML PUBLIC "-//W3C//DTD HTML 4.0 Transitional//EN">
<html>
<head>
    <title>CRM 2011 HTML Web Resource </title>
    <!-- including the 'ClientGlobalContext.js.asp'
     -- which gives the context information-->
    <script src="ClientGlobalContext.js.aspx">
    </script>
     <!-- including the minified version of jquery-->
    <script type="text/javascript" src="new_jquery_1.4.1.min.js"></script>
    <script language="javascript">
        function getAllData() {
            var serverUrl;
            var ODataPath;
            var userid;
            var userRole;
            var OrgName;
            var context = GetGlobalContext();
            serverUrl = context.getServerUrl();
            ODataPath = serverUrl + "/XRMServices/2011/OrganizationData.svc";
            userid = context.getUserId();
            userRole = context.getUserRoles();
            OrgName = context.getOrgUniqueName();
            Text1.Title = serverUrl;
            Text2.Title = userid;
            Text3.Title = userRole;
            Text4.Title = OrgName;
            Text1.value = serverUrl;
            Text2.value = userid;
            Text3.value = userRole;
            Text4.value = OrgName;
        }
    </script>
</head>
<body onload="getAllData();">
    <p>ServerURL:&nbsp;
        <input id="Text1" type="text" /></p>
    <p>User ID &nbsp;
        <input id="Text2" type="text" /></p>
    <p>User Role &nbsp;
        <input id="Text3" type="text" /></p>
    <p>Oraganization &nbsp;
        <input id="Text4" type="text" /></p>
 </body>
</html>

In this post we will see

  1. how to add HTML web resource to CRM 2011 Form
  2. How to get the Context in the HTML web resource
  3. How to use the GetGlobalContext function,

Steps to Follow

  1. Create a new solution
  2. Add a new Entity called –’TestforHTMLWebresource’
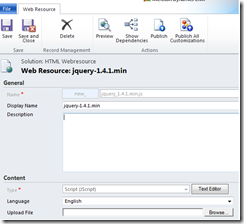
  3. Add  a Web Resource  with the name’Jquery1.4.1’ minified version as shown in the screenshot
  4. image
  5. Add another HTML page as a webresource  but with the following Code.

  6. Save and Publish the HTML webresource,
  7. open the Entity form
  8. insert the above created HTML web resource
  9. Publish all the customizations and Export the Solution
  10. Reimport the solution
  11. Refresh the browser.
  12. You can observe  the  HTML Webresource showing the Following Values
    1. server Url
    2. userId
    3. User Role
    4. Organization.
  13. The solution appears as detailed in the below screenshot
  14. image
  15. The complete solution file can be downloaded from here

CRM 2011: Web Resources

What are  Web Resources?

Web Resources are the Virtual files stored in Microsoft Dynamics CRM Database, and also they can be accessible using a unique URL address

Why do we use Web Resources?

Web Resources are used to extend the CRM web application which can be in the form of html, Jscript, Silverlight applications

Where can we use Web resources?

Web Resources can be used in

  1. Form Customization
  2. Sitemap
  3. Application Ribbons

What are the major Limitations for Web Resources?

  1. No Support for .ASPX pages
  2. Web Resources are Limited to Static Files or files processed by browser only.
  3. Maximum Size of the web resource is determined by Organization.MaxUploadFileSize property

Web Resource Types?

File

File extensions

Type

Web Page (HTML)

.htm, .html

1

Style Sheet (CSS)

.css

2

Script (JScript)

.js

3

Data (XML)

.xml

4

Image (PNG)

.png

5

Image (JPG)

.jpg

6

Image (GIF)

.gif

7

Silverlight (XAP)

.xap

8

StyleSheet (XSL)

.xsl, .xslt

9

Image (ICO)

.ico

10


How to refer web Resources?

  1. use $webresource directive (in Sitemap or Ribbon)
  2. outside an entity form or chart you must create an HTML Web resource to be the host page for the Silverlight Web resource. Then use the $webresource: directive to open the HTML Web resource
  3. Use Relative URL where the $Webresource directive is not supported.

Ribbon Customization Part 12:Custom Ribbon Tab in CRM is now always selected

Usually when we add a custom tab to the HomePageGrid as discussed in the post  , it will add the custom tab but when navigate to different entities , All the times, Custom Tab is selected, in order to avoid that we need add the below TabDisplayRule

<TabDisplayRules>

     <TabDisplayRule TabCommand="Mscrm.Isv.Global">

          <EntityRule Context ="HomePageGrid" AppliesTo ="SelectedEntity"/>

      </TabDisplayRule>

</TabDisplayRules>


That’s it.,by this You can avoid the default selection of the custom Tab all the times.

Ribbon Customization Part 11:Enable,Disable Ribbon button based on Security Role

After  a small gap I am blogging again, as I have there  there is a requirement for the ribbon controls to he shown depending on the security role.

So in this post I am  going to show a  custom button, in the Case homepage grid  under the Actions group. and I will make this button to be enabled only when the user with the “System Admin”role has logged in and I don’t enable this button for the rest of the users. << and also this button has the functionality for the Resolve Case>>

Steps to follow

  1. Create a solution
  2. Add  the entity ‘case’
  3. Add a Javascript webresource with the following code and named as ‘CommonLibrabry’
  4. function UserHasRole(roleName) {


        var serverUrl = Xrm.Page.context.getServerUrl();

        var oDataEndpointUrl = serverUrl + "/XRMServices/2011/OrganizationData.svc/";

        oDataEndpointUrl += "RoleSet?$top=1&$filter=Name eq '" + roleName + "'";

        var service = GetRequestObject();

        if (service != null) {

            service.open("GET", oDataEndpointUrl, false);

            service.setRequestHeader("X-Requested-Width", "XMLHttpRequest");

            service.setRequestHeader("Accept", "application/json, text/javascript, */*");

            service.send(null);

            var requestResults = eval('(' + service.responseText + ')').d;

            if (requestResults != null && requestResults.results.length == 1) {

                var role = requestResults.results[0]; 

                var id = role.RoleId;

                var currentUserRoles = Xrm.Page.context.getUserRoles();

                for (var i = 0; i < currentUserRoles.length; i++) {

                    var userRole = currentUserRoles[i];

                    if (GuidsAreEqual(userRole, id)) {

                        return true;

                    }

                }

            }

        }


        return false;

    }


    function GetRequestObject() {

        if (window.XMLHttpRequest) {

            return new window.XMLHttpRequest;

        }

        else {

            try {

                return new ActiveXObject("MSXML2.XMLHTTP.3.0");

            }

            catch (ex) {

                return null;

            }

        }

    }

    function GuidsAreEqual(guid1, guid2) {

        var isEqual = false;

        if (guid1 == null || guid2 == null) {

            isEqual = false;

        }

        else {

            isEqual = guid1.replace(/[{}]/g, "").toLowerCase() == guid2.replace(/[{}]/g, "").toLowerCase();

        }


        return isEqual;

    }


    function callMain() {


    if(UserHasRole("System Administrator"))

    {

    return true;

    }

    else 

    {

    return false;

    }


    }

  5. Export the solution
  6. Unzip the solution
  7. Edit the customization
  8. Add the below custom action to display the button under the –Actions Group in the HomepageGrid
  9. <CustomAction Id ="sample.HomepageGrid.incident.MainTab.Actions.CustomAction" 

    Location ="Mscrm.HomepageGrid.incident.MainTab.Actions.Controls._children" 

                           Sequence ="10">

              <CommandUIDefinition>           

                  <Button Id="sample.HomepageGrid.incident.MainTab.Actions.Button"

                          Command="sample.HomepageGrid.incident.MainTab.Actions.Command"

                          LabelText="$LocLabels:sample.HomepageGrid.incident.MainTab.Actions.LabelText"

                          ToolTipTitle="$LocLabels:sample.HomepageGrid.incident.MainTab.Actions.LabelText"

                          ToolTipDescription="$LocLabels:sample.HomepageGrid.incident.MainTab.Actions.ToolTip"

                          TemplateAlias="o1"

                          Image16by16="/_imgs/ribbon/AddEmail_16.png"

                          Image32by32="/_imgs/ribbon/Email_32.png" />             

              </CommandUIDefinition>         

            </CustomAction>

  10. Define the command definition., basically this button has the functionality of << Resolving a case>>
    1. this will enable when only one record is selected in the Grid and also if the user has the ‘System Administrator” Role
    2. <CommandDefinition Id="sample.HomepageGrid.incident.MainTab.Actions.Command">

                 <EnableRules>

                   <EnableRule Id="Mscrm.CustomcheckRole" />

                   <EnableRule Id="Mscrm.SelectionCountExactlyOne" />             

                   <EnableRule Id="Mscrm.VisualizationPaneNotMaximized" />

                 </EnableRules>

                 <DisplayRules>

                   <DisplayRule Id="Mscrm.CanChangeIncidentForm" />

                 </DisplayRules>

                 <Actions>

                   <JavaScriptFunction FunctionName="Mscrm.IncidentActions.resolveCase" Library="/_static/_common/scripts/ribbonactions.js">

                     <CrmParameter Value="FirstSelectedItemId" />

                     <CrmParameter Value="SelectedControl" />

                   </JavaScriptFunction>

                 </Actions>

               </CommandDefinition>

  11. Provide the appropriate Display rule as well as the Enable rules as shown below
  12. <DisplayRules>

               <DisplayRule Id="Mscrm.CanChangeIncidentForm">

                 <EntityPrivilegeRule EntityName="incident" PrivilegeType="Write" PrivilegeDepth="Basic" />

                 <EntityPrivilegeRule EntityName="incident" PrivilegeType="AppendTo" PrivilegeDepth="Basic" />

                 <EntityPrivilegeRule EntityName="activitypointer" PrivilegeType="Create" PrivilegeDepth="Basic" />

                 <EntityPrivilegeRule EntityName="activitypointer" PrivilegeType="Append" PrivilegeDepth="Basic" />

               </DisplayRule>            

             </DisplayRules>

             <EnableRules>

               <EnableRule Id="Mscrm.SelectionCountExactlyOne">

                 <SelectionCountRule Minimum="1" Maximum="1" AppliesTo="SelectedEntity" />

               </EnableRule>

               <EnableRule Id="Mscrm.VisualizationPaneNotMaximized">

                 <CustomRule FunctionName="Mscrm.RibbonActions.disableButtonsWhenChartMaximized"

             Library="/_static/_common/scripts/RibbonActions.js">

                   <CrmParameter Value="SelectedControl" />

                 </CustomRule>

               </EnableRule>

               <EnableRule Id="Mscrm.CustomcheckRole">

                 <CustomRule FunctionName="callMain"

     Library="$webresource:new_CommonLibrary">

                 </CustomRule>

               </EnableRule>

             </EnableRules>

  13. Provide the locales as shown below
  14. <LocLabels>

             <LocLabel Id="sample.HomepageGrid.incident.MainTab.Actions.LabelText">

               <Titles>

                 <Title languagecode="1033"

                         description="Custom Button1" />

               </Titles>

             </LocLabel>

             <LocLabel Id="sample.HomepageGrid.incident.MainTab.Actions.ToolTip">

               <Titles>

                 <Title languagecode="1033"

                         description="Custom Button1" />

               </Titles>

             </LocLabel>

           </LocLabels>

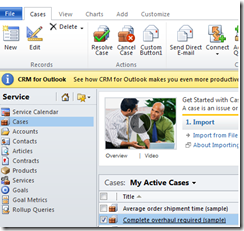
  15. The screenshot appears as  shown below. when I logged with a user having system Admin role
  16. EnableRibbon button based on securityrole_CRM2011
  17. The screenshot appears as  shown below. when I logged with a user who doesn’t have system Admin role
  18. disable ribbon button based on security Role_CRM 2011
  19. The entire source code can be downloaded from here
  20. Happy learning Smile

Ribbon Customization Part-10-Hide ‘Add Existing’ button in Dynamics CRM 2011

To day we will see how to hid the ‘Add existing’ button on the Contact Associated view on the Account Entity. (Hiding Add Existing button was a very popular requirement in CRM 4.0)

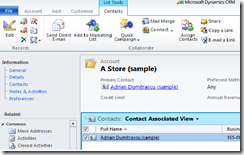
When you open an Account entity record and click on ‘Contacts’ in the left navigation bar of the entity. you can see’Add New Contact’ and ‘Add Existing Contact’ buttons. Today we will see how to hide them using the Ribbon Customization

Follow the bellow steps

  1. Create a Solution ‘Add Contact entity
  2. Export the solution
  3. Unzip and Edit the Customizations.xml file
  4. Now we need to fine the Id of the ‘Add Existing’,Add New’ Buttons  For this I opened the ‘contactribbon.xml’ which is available under ..\\sdk\samplecode\cs\client\ribbon\exportribbonxml\exportedribbonxml( this location depends on the Sdk installation directory  on the file system)
  5. I found the ids as shown  below from the contactribbon.xml
  6. ContactRibbon
  7. Add  the below code  in the RibbonDiffXML
  8.    1: <CustomActions>

       2:          <HideCustomAction Location="Mscrm.SubGrid.contact.AddNewStandard" HideActionId="sample.Mscrm.SubGrid.contact.AddNewStandard.HideAction" />

       3:          <HideCustomAction Location="Mscrm.SubGrid.contact.AddExistingAssoc" HideActionId="sample.Mscrm.SubGrid.contact.AddExistingAssoc.HideAction" />

       4:          <HideCustomAction Location="Mscrm.SubGrid.contact.AddExistingStandard" HideActionId="sample.Mscrm.SubGrid.contact.AddExistingStandard.HideAction" />

       5:        </CustomActions>

  9. Save it, Zip it and Import the Solution
  10. Refresh the browser the screenshot looks like below
  11. Hide Add Exisitng Buttons
  12. Download the entire solution from here.

CRM 2011 JavaScript

Just thought of Working on CRM 2011 JavaScript and found a good post  which might be a starting point to see how to Script in CRM 2011. It’s a Good article to spend some time.

Dynamics CRM 2011 Ribbon Customization Index

Here I am listing the index for my posts For Ribbon Customization

Topic Link
Understanding the CRM 2011 Ribbon
https://dynamicscrm2011.wordpress.com/2011/04/05/ribbon-customization/
Adding a Custom Tab to the CRM 2011 ribbon ( for HomePageGrid., and this will display for all the entities—like a Custom ISV Tab)

https://dynamicscrm2011.wordpress.com/2011/04/12/ms-dynamics-crm-2011-ribbon-customization-part-i-add-a-custom-tab-to-microsoft-dynamics-crm-2011-ribbon/

Understanding the Ribbon Customization-Schemas of the Ribbon https://dynamicscrm2011.wordpress.com/2011/04/12/ms-dynamics-crm-2011-ribbon-customization-part-2-understanding-the-ribbon-customization/
Adding a Custom Tab to the Specific Entity ( i.e for opportunity entity) https://dynamicscrm2011.wordpress.com/2011/04/13/ribbon-customization-part-3-add-a-custom-tab-to-a-specific-entityopportunity-entity/
Adding a Custom Tab, Custom Group,Button to the Grid Ribbon of a specific entity (i.e for Opportunity Entity) https://dynamicscrm2011.wordpress.com/2011/04/27/ribbon-customization-part-4-add-a-custom-tab-custom-group-and-custom-buttons-to-a-specific-entityopportunity-entity/
Adding a Custom Tab, Custom Group,Button to the Form Ribbon and SubGrid Ribbon of a specific entity (i.e for Opportunity Entity) https://dynamicscrm2011.wordpress.com/2011/04/27/ribbon-customization-part-5-add-a-custom-tab-custom-group-and-custom-buttons-to-a-form-ribbon-for-a-specific-entityopportunity-entity/
Adding a  Custom Group,Button to the existing tab of a specific entity (i.e for Opportunity Entity) https://dynamicscrm2011.wordpress.com/2011/04/28/ribbon-customization-part-6-add-a-custom-group-and-custom-buttons-to-existing-tab-for-a-specific-entityopportunity-entity/
Hiding a Ribbon Button in CRM 2011 https://dynamicscrm2011.wordpress.com/2011/04/28/ribbon-customization-part-7-hiding-a-ribbon-button-in-dynamics-crm-2011/
Hiding a Group of Ribbon Buttons in CRM 2011 https://dynamicscrm2011.wordpress.com/2011/04/29/ribbon-customization-part-8-hiding-a-group-of-ribbon-buttons-in-dynamics-crm-2011/
Adding a Button to Existing Group for custom entity’s Ribbon in Dynamics CRM 2011 https://dynamicscrm2011.wordpress.com/2011/05/02/ribbon-customization-part-9-adding-a-button-to-existing-group-for-custom-entitys-ribbon-in-dynamics-crm-2011/